The Ultimate Guide to Removing Swirl Marks & Scratches from Your Car’s Paint
Removing swirl marks and scratches from your car’s paint requires a combination of proper washing techniques, polishing with the right tools and compounds, and applying protective measures to prevent future damage, ensuring a smooth and glossy finish.
Is your car’s paint marred by unsightly swirl marks and scratches? Don’t despair! This ultimate guide to removing swirl marks and scratches from your car’s paint will provide you with the knowledge and techniques to restore your vehicle’s finish to its former glory, making it look like new again.
Understanding Swirl Marks and Scratches
Before diving into the removal process, it’s crucial to understand what swirl marks and scratches are and how they occur. This knowledge will help you choose the right approach for their removal and prevent them in the future.
What are Swirl Marks?
Swirl marks are fine, circular scratches in the paint’s clear coat that appear as a hazy or spiderweb-like pattern. They are typically caused by improper washing and drying techniques.
What are Scratches?
Scratches are deeper imperfections in the paint that can penetrate the clear coat and even reach the base coat. They can be caused by various factors, including keys, branches, and road debris.
Here are some common causes of swirl marks and scratches:
- Improper washing techniques (using dirty sponges or brushes)
- Automatic car washes with abrasive brushes
- Drying your car with a dirty towel
- Rubbing against the car with clothing or accessories
Understanding these origins helps you take preventive measures during car care.
Prevention is always better than cure. By adopting proper washing and drying methods, you can significantly reduce the risk of swirl marks and scratches.
Essential Tools and Products
To effectively remove swirl marks and scratches, you’ll need the right tools and products. This section outlines the essential items required for the job.
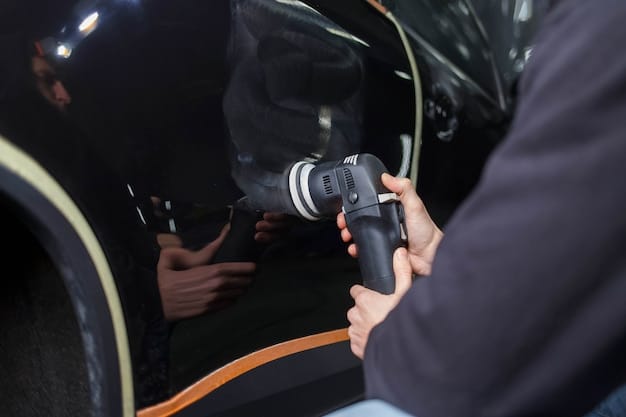
Polishing Machine
A polishing machine, also known as a buffer, is a power tool used to apply and work polishing compounds into the paint. There are two main types: dual-action (DA) and rotary.
Polishing Pads
Polishing pads come in various materials and levels of abrasiveness. Foam pads are the most common, and they range from cutting pads (for heavy correction) to finishing pads (for refining the paint).
Alongside the machines and pads, ensuring you have these products will help with the process:
- Polishing Compounds: These contain abrasive particles that remove imperfections in the paint. They come in different grades, from coarse to fine.
- Microfiber Towels: Used for wiping away polishing compound residue.
- Detailing Clay: Removes contaminants bonded to the paint surface.
Investing in quality tools and products is essential for achieving the best results and preventing further damage to your car’s paint.
Always read the product instructions carefully and test the products in an inconspicuous area before applying them to the entire car.
Preparing Your Car for Paint Correction
Before starting the paint correction process, it’s essential to properly prepare your car. This involves cleaning the surface, removing bonded contaminants, and masking off delicate areas.
Washing
Start by thoroughly washing your car to remove dirt, grime, and loose debris. Use a pH-neutral car wash soap and the two-bucket method to minimize swirl marks during the washing process.
Clay Bar Treatment
Use a detailing clay bar to remove any bonded contaminants, such as brake dust, tree sap, and industrial fallout. This step ensures that the polishing pad doesn’t pick up and drag these contaminants across the paint, causing further scratches.
Steps in preparing the car:
- Wash and dry the car thoroughly.
- Inspect the paint for swirl marks and scratches.
- Decontaminate the paint with a clay bar.
Proper preparation is critical for achieving optimal paint correction results and protecting your car’s paint from further damage.
Always work in a well-lit area to clearly see the swirl marks and scratches you’re trying to remove.
Step-by-Step Guide to Removing Swirl Marks
Now that your car is prepared, it’s time to begin the swirl mark removal process. This section provides a step-by-step guide to achieving a swirl-free finish.
Applying Polishing Compound
Apply a small amount of polishing compound to your polishing pad. Start with a less aggressive compound and pad combination to minimize the risk of removing too much clear coat.
Polishing Technique
Turn on the polishing machine and use overlapping passes to work the compound into the paint. Apply moderate pressure and keep the pad flat against the surface. Work in small sections, typically 2×2 feet.
Follow these steps for effective polishing:
- Apply a small amount of compound to the polishing pad.
- Work the compound into the paint using overlapping passes.
- Wipe away the residue with a clean microfiber towel.
Patience and precision are key to achieving a swirl-free finish. Don’t rush the process, and take your time to ensure that each section is properly polished.
Regularly inspect your work and adjust your technique as needed. If you’re not seeing the desired results, try a more aggressive compound or pad.
Addressing Deeper Scratches
Deeper scratches may require a more aggressive approach than swirl mark removal. This section provides guidance on how to address these imperfections.
Assessing the Scratch
Before attempting to remove a deep scratch, assess its severity. If the scratch has penetrated the base coat, it may require professional repair.
Wet Sanding
Wet sanding is a technique used to level the edges of a deep scratch. It involves using fine-grit sandpaper (e.g., 3000 grit) lubricated with water to carefully remove a thin layer of clear coat.
Procedures for addressing deeper scratches:
- Assess the severity of the scratch.
- Wet sand the area around the scratch to level the edges.
- Polish the area to remove sanding marks.
Wet sanding should only be performed by experienced detailers, as it can easily damage the paint if done incorrectly. If you’re not comfortable with this technique, it’s best to seek professional assistance.
After wet sanding, it’s essential to polish the area to remove any sanding marks and restore the paint’s gloss.
Protecting Your Paint After Correction
Once you’ve removed the swirl marks and scratches, it’s essential to protect your car’s paint to prevent future damage. This section outlines various protective measures you can take.
Waxing and Sealing
Applying a coat of wax or sealant provides a protective barrier against UV rays, water, and other environmental contaminants. It also enhances the paint’s gloss and depth.
Ceramic Coating
A ceramic coating is a more durable and long-lasting protective option. It forms a hard, chemical-resistant layer that protects the paint from scratches, swirl marks, and fading.
Here are some ways to protect your paint:
- Apply wax or sealant regularly.
- Consider a ceramic coating for long-term protection.
- Use a high-quality car cover when parking outdoors.
Protecting your paint properly will keep it looking its best for years to come. Regular maintenance and proper care are essential for preserving the results of your paint correction efforts.
Choose the protective coating that best suits your needs and budget. Wax and sealants offer cost-effective protection, while ceramic coatings provide superior durability.
| Key Point | Brief Description |
|---|---|
| 🧼 Washing | Use a pH-neutral soap and two-bucket method to minimize swirl marks. |
| 🛠️ Polishing | Apply compound with overlapping passes, using moderate pressure. |
| 🛡️ Protection | Apply wax, sealant, or ceramic coating to protect paint from damage. |
| 🧪 Clay Bar | Remove bonded contaminants before polishing for a smoother surface. |
Frequently Asked Questions
▼
While it’s possible to reduce swirl marks by hand, it’s much more effective to use a polishing machine. The machine provides the necessary power and consistency for optimal results with less effort.
▼
Polishing should only be done when necessary, as it removes a thin layer of clear coat. Typically, polishing once or twice a year is sufficient for maintaining a swirl-free finish, depending on paint condition.
▼
The best type of polishing pad depends on the severity of the swirl marks. For heavy correction, use a cutting pad. For lighter swirl marks, a polishing pad is sufficient. For the best finishing, a finishing pad can be used.
▼
No, household cleaners are not designed for car paint and can cause damage. Always use products specifically formulated for automotive paint to avoid streaking, discoloration, or clear coat damage.
▼
Yes, a ceramic coating is a worthwhile investment for long-term paint protection. It provides superior scratch resistance, UV protection, and hydrophobicity compared to wax or sealant, making car care easier.
Conclusion
Removing swirl marks and scratches from your car’s paint may seem like a daunting task, but with the right tools, products, and techniques, it’s definitely achievable. By following this ultimate guide to removing swirl marks and scratches from your car’s paint described above, you can restore your vehicle’s finish to its former glory and enjoy a swirl-free, showroom-worthy shine.


")

