Detail Your Car Interior Like a Pro: Step-by-Step Guide
Detailing your car’s interior like a pro involves a systematic approach, starting with removing loose items and vacuuming, followed by cleaning surfaces with appropriate products, and finishing with protecting and conditioning materials to maintain a fresh and pristine environment.
Want to keep your car’s interior looking showroom new? How to detail your car’s interior like a pro: a step-by-step guide will give you all the secrets and techniques to achieve a spotless and fresh interior, enhancing your driving experience and preserving your car’s value.
Getting Started: Preparing for Interior Detailing
Before diving into the nitty-gritty, preparation is key. A well-prepared workspace and the right tools can make the detailing process smoother and more efficient. This initial phase focuses on gathering supplies and setting up your car for a thorough cleaning.
It’s about creating a conducive environment where you can work comfortably and systematically, ensuring no area is missed. Good preparation saves time and prevents potential damage during the cleaning process.
Gathering Your Detailing Supplies
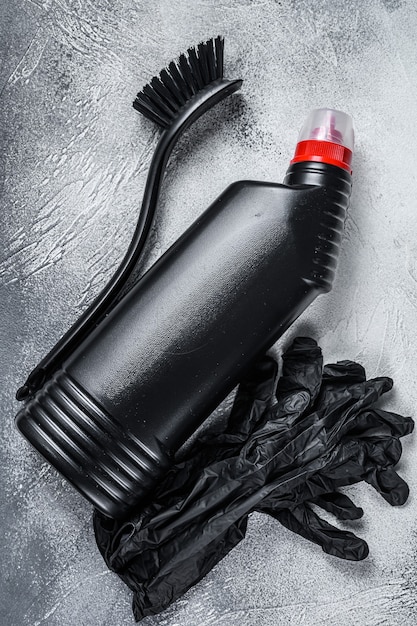
The first step is gathering all the necessary supplies. Having everything within reach will save you time and effort. Here are some essential items you’ll need:
- Vacuum Cleaner: A powerful vacuum with various attachments to reach every nook and cranny.
- Microfiber Cloths: Soft, lint-free cloths for wiping surfaces without scratching.
- Detailing Brushes: Different sizes to clean vents, crevices, and delicate areas.
- Interior Cleaner: A pH-balanced cleaner suitable for various interior surfaces like plastic, vinyl, and leather.
Preparing Your Car’s Interior
Now, let’s prepare your car’s interior. Start by removing all loose items, such as trash, personal belongings, and floor mats. This will give you a clear workspace and prevent you from missing any areas during the cleaning process.
- Remove All Items: Empty the glove compartment, center console, and door pockets.
- Take Out Floor Mats: Remove the floor mats and set them aside for separate cleaning.
- Open Doors and Windows: This will improve ventilation and allow any cleaning products to dry quickly.
By taking these preparatory steps, you’ll set yourself up for a successful and efficient detailing session. Remember, a clean start leads to a polished finish.
Vacuuming: The Foundation of a Clean Interior
Vacuuming is a critical step in detailing your car’s interior. It removes loose dirt, dust, and debris from carpets, seats, and crevices. Thorough vacuuming sets the stage for more detailed cleaning and ensures a pristine finish.
Investing time in this step will significantly improve the overall cleanliness of your car’s interior. A clean surface allows cleaning products to work more effectively, resulting in a fresher and more polished look.
Vacuuming Carpets and Seats
Start by vacuuming the carpets and seats thoroughly. Use a vacuum cleaner with appropriate attachments to reach under the seats and along the edges. Pay special attention to high-traffic areas where dirt tends to accumulate.
- Use a Crevice Tool: To reach tight spaces and corners.
- Brush Attachment: For loosening stubborn dirt and debris from carpets and upholstery.
- Overlap Your Strokes: To ensure every area is covered evenly.
Vacuuming Hard-to-Reach Areas
Don’t forget those hard-to-reach areas. Use a crevice tool to vacuum along the dashboard, center console, and door panels. Clean out air vents and crevices where dust and debris can hide.
- Air Vents: Use a small brush attachment to gently remove dust from air vents.
- Center Console: Vacuum around buttons, knobs, and storage compartments.
- Door Panels: Pay attention to seams and crevices where dirt can accumulate.
A thorough vacuuming job sets the foundation for a truly clean interior. By removing loose dirt and debris, you prepare the surfaces for detailed cleaning and protect them from scratches during the process.
Cleaning Interior Surfaces: Plastics, Vinyl, and Leather
Once you’ve vacuumed, it’s time to clean the various surfaces inside your car. This includes plastics, vinyl, and leather, each requiring specific cleaning techniques and products to avoid damage and ensure a lasting clean.
Using the right approach for each material will not only enhance their appearance but also protect them from wear and tear. Proper cleaning maintains the integrity and beauty of your car’s interior.
Cleaning Plastics and Vinyl
Plastics and vinyl surfaces are common in car interiors and can accumulate dirt, dust, and grime over time. Use a pH-balanced interior cleaner and a microfiber cloth to gently wipe down these surfaces.
- Spray Cleaner Onto Cloth: Avoid spraying directly onto the surface to prevent oversaturation.
- Wipe in Circular Motions: To lift dirt and grime effectively.
- Dry with a Clean Cloth: To prevent water spots and streaks.
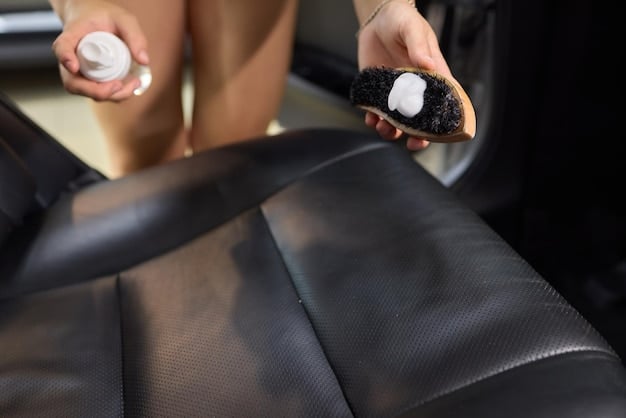
Cleaning Leather Surfaces
Leather surfaces require special care to prevent drying and cracking. Use a leather cleaner specifically formulated for car interiors. Apply a small amount to a microfiber cloth and gently wipe the leather surfaces.
- Test in a Small Area: Before applying to the entire surface to ensure compatibility.
- Apply Leather Conditioner: After cleaning to moisturize and protect the leather.
- Buff with a Clean Cloth: To remove excess conditioner and leave a natural shine.
By cleaning these various surfaces with the appropriate techniques and products, you can restore your car’s interior to its original glory. Remember to always use gentle motions and avoid harsh chemicals that can cause damage.
Addressing Stains and Spots: Effective Techniques
Stains and spots are inevitable in a car’s interior, from spilled coffee to muddy footprints. Addressing these promptly and effectively is crucial to maintaining a clean and fresh environment. Different types of stains require different approaches for successful removal.
Ignoring stains can lead to permanent damage and unpleasant odors. By using the right techniques and products, you can tackle even the most stubborn stains and spots, keeping your car’s interior looking its best.
Treating Fabric Stains
For fabric stains, such as coffee or juice spills, act quickly. Blot the stain with a clean cloth to absorb as much liquid as possible. Then, use a fabric stain remover specifically designed for car interiors.
- Apply Stain Remover: Follow the product instructions and apply the stain remover to the affected area.
- Gently Scrub: Use a soft brush or microfiber cloth to gently scrub the stain in circular motions.
- Blot and Dry: Blot the area with a clean cloth to remove excess moisture and allow it to air dry.
Removing Stubborn Spots
Stubborn spots, like grease or ink, may require more aggressive treatment. Use a specialized spot remover or a mixture of mild detergent and water. Apply the solution to the spot and let it sit for a few minutes before gently scrubbing.
- Test in an Inconspicuous Area: Before applying to the stain to ensure it doesn’t damage the fabric.
- Use a Detail Brush: To work the solution into the spot effectively.
- Rinse and Dry: Rinse the area with clean water and blot dry with a clean cloth.
Addressing stains and spots promptly and using the appropriate techniques can prevent them from becoming permanent fixtures in your car’s interior. Regular stain removal keeps your car looking clean and well-maintained.
Detailing the Dashboard and Console: Precision Cleaning
The dashboard and console are typically high-touch areas that accumulate dust, fingerprints, and grime. Detailing these areas requires precision and care to ensure a clean and polished finish. Proper cleaning enhances the overall appearance of your car’s interior.
Attention to detail in these areas can significantly improve the driving experience. A clean dashboard and console not only look better but also contribute to a more hygienic environment inside your car.
Cleaning the Dashboard
Start by dusting the dashboard with a soft brush or microfiber cloth. Pay attention to air vents, gauges, and crevices where dust tends to accumulate. Use a pH-balanced interior cleaner to wipe down the surfaces.
- Use a Detailing Brush: To reach tight spaces and corners.
- Wipe with a Microfiber Cloth: To avoid scratching the surface.
- Apply a UV Protectant: To protect the dashboard from sun damage and prevent fading.
Cleaning the Center Console
The center console, including cupholders and storage compartments, can often be a source of spills and grime. Remove any loose items and use a detailing brush and interior cleaner to scrub these areas.
- Clean Cupholders: Remove any residue and disinfect with a mild cleaner.
- Vacuum Storage Compartments: Remove dirt and debris from inside the compartments.
- Wipe Down Surfaces: With a microfiber cloth and interior cleaner to remove fingerprints and grime.
By detailing the dashboard and console with precision, you can maintain a clean and attractive interior. Regular cleaning not only improves the appearance but also protects these areas from long-term damage.
Final Touches: Enhancing and Protecting Your Interior
After cleaning all the surfaces, it’s time for the final touches to enhance and protect your car’s interior. These steps will leave your car looking and feeling fresh, while also providing long-term protection against wear and tear.
These finishing touches are what separate a basic cleaning from a professional detailing job. They add a layer of polish and protection that keeps your car’s interior in top condition for longer.
Applying Interior Protectants
Apply interior protectants to plastic, vinyl, and leather surfaces to shield them from UV rays, fading, and cracking. These products create a barrier that helps repel dirt and dust, making it easier to clean in the future.
- Choose the Right Product: Select a protectant that is specifically designed for the material you’re treating.
- Apply Evenly: Use a clean microfiber cloth to apply the protectant in a thin, even layer.
- Buff to a Shine: After a few minutes, buff the surface with a clean cloth to remove any excess product and leave a natural shine.
Replacing Floor Mats and Air Fresheners
Complete the detailing process by replacing the floor mats and adding an air freshener. Clean floor mats not only enhance the appearance of your car but also protect the carpets from dirt and wear. A pleasant air freshener leaves your car smelling fresh and inviting.
- Clean Floor Mats: Vacuum or wash the floor mats to remove dirt and stains.
- Replace Air Freshener: Choose a scent that you enjoy and replace the air freshener as needed.
- Check for Any Missed Spots: Do a final walk-through to ensure no area has been overlooked.
By adding these final touches, you’ll ensure that your car’s interior looks its best and remains protected from future damage. Regular detailing and maintenance will keep your car’s interior in excellent condition for years to come.
| Key Point | Brief Description |
|---|---|
| 🧹 Vacuuming | Removes loose dirt and debris from carpets, seats, and hard-to-reach areas. |
| 🧽 Surface Cleaning | Cleaning plastic, vinyl, and leather with appropriate cleaners for each material. |
| ✨ Stain Removal | Effective techniques for addressing stains and spots on fabric and other surfaces. |
| 🛡️ Protection | Applying protectants for plastics, vinyl, and leather to shield from UV and wear. |
Frequently Asked Questions
▼
You’ll need a vacuum cleaner, microfiber cloths, detailing brushes, interior cleaner, leather cleaner (if applicable), and protectants. Having the right tools ensures a thorough and safe cleaning process.
▼
Detailing every 3-6 months is recommended for maintaining cleanliness and preventing long-term damage. High-traffic vehicles may need more frequent detailing.
▼
It’s best to avoid household cleaners as they can be too harsh and damage interior surfaces. Use cleaners specifically formulated for car interiors to ensure safety and effectiveness.
▼
Blot the stain immediately, apply a fabric stain remover, gently scrub with a soft brush, and blot dry. Repeat if necessary, and avoid using excessive moisture.
▼
Apply a UV protectant regularly to shield the dashboard from UV rays, preventing fading and cracking. Park in shaded areas when possible to further protect the interior.
Conclusion
Mastering the art of detailing your car’s interior like a professional is achievable with the right tools, techniques, and a touch of patience. By following this step-by-step guide, you can ensure a spotless, fresh, and well-maintained interior that enhances your driving experience and preserves your vehicle’s value.


