DIY Car Clay Bar Treatment: Smooth Paint & Remove Contaminants

DIY car clay bar treatment involves using a specialized clay bar to remove embedded contaminants from your car’s paint, leaving a smooth, clean surface ideal for waxing or polishing, and enhancing its overall appearance.
Is your car’s paint feeling rough, even after a wash? It’s likely contaminated with particles that washing alone can’t remove. A DIY car clay bar treatment is the solution to restore that smooth, glossy finish, and it’s easier than you think!
What is a Car Clay Bar and Why Use It?
A car clay bar is a detailing tool designed to remove contaminants that are embedded in your car’s paint, such as brake dust, industrial fallout, and tree sap. These contaminants can’t be removed by regular washing and can leave the paint feeling rough and looking dull.
Types of Clay Bars
- Mild Clay: Suitable for vehicles with light contamination and regular detailing.
- Medium Clay: Effective for removing moderate contamination, such as light overspray or stubborn road grime.
- Aggressive Clay: Designed for heavily contaminated vehicles, but should be used with caution as it can mar the paint.
Benefits of Using a Clay Bar
- Removes embedded contaminants that washing can’t.
- Restores a smooth, glossy finish to your car’s paint.
- Prepares the paint for waxing or polishing.
- Enhances the overall appearance of your vehicle.
Using a clay bar is an essential step in achieving a professional-level detailing job at home. It ensures that your car’s paint is clean and smooth, allowing wax or polish to adhere properly and provide maximum protection and shine.
Gathering Your Supplies for the DIY Treatment
Before you start your DIY car clay bar treatment, it’s important to gather all the necessary supplies. Having everything on hand will make the process smoother and more efficient.
Essential Supplies
- Clay Bar: Choose the appropriate grade of clay bar based on the level of contamination on your car’s paint.
- Clay Lube: A specialized lubricant designed to prevent the clay bar from scratching the paint.
- Microfiber Towels: Soft, clean microfiber towels for wiping away residue.
- Two Buckets: One for washing and one for rinsing.
- Car Wash Soap: A pH-neutral car wash soap to clean the car before claying.
Optional Supplies
While the essential supplies are enough to get the job done, these optional items can make the process easier and more effective.
- Detailing Spray
- Latex or Nitrile Gloves
- Bucket Grit Guards
Gathering all your supplies beforehand will save you time and ensure that you have everything you need to complete the DIY car clay bar treatment effectively. This preparation is key to achieving professional-looking results.
Preparing Your Car for the Clay Bar Treatment
Proper preparation is crucial for a successful DIY car clay bar treatment. This includes washing your car thoroughly and ensuring the surface is clean and free of loose dirt and debris.
Washing Your Car
Start by rinsing your car with water to remove any loose dirt. Then, wash your car using the two-bucket method to prevent scratching the paint. Use a pH-neutral car wash soap and a soft wash mitt.
Drying Your Car
After washing, dry your car thoroughly with a clean microfiber towel. Ensure there are no water spots or streaks on the paint before proceeding.
Inspecting the Paint
Once your car is clean and dry, inspect the paint for any visible contaminants. Run your hand over the surface to feel for roughness. This will help you determine the severity of the contamination and choose the appropriate clay bar.
By properly preparing your car, you’ll ensure that the clay bar can effectively remove embedded contaminants and restore a smooth finish to your paint. This step is essential for achieving optimal results from your DIY car clay bar treatment.
Step-by-Step Guide to Using a Car Clay Bar
Now that your car is prepped and you have all your supplies ready, it’s time to start the DIY car clay bar treatment. Follow these steps to safely and effectively remove contaminants from your paint.
Step 1: Prepare the Clay Bar
Take the clay bar out of its packaging and knead it in your hands to soften it. Flatten the clay into a circular or oval shape that fits comfortably in your palm.
Step 2: Apply Clay Lube
Spray a generous amount of clay lube onto a small section of your car’s paint. Work in sections of about 2×2 feet to ensure the lube doesn’t dry out.
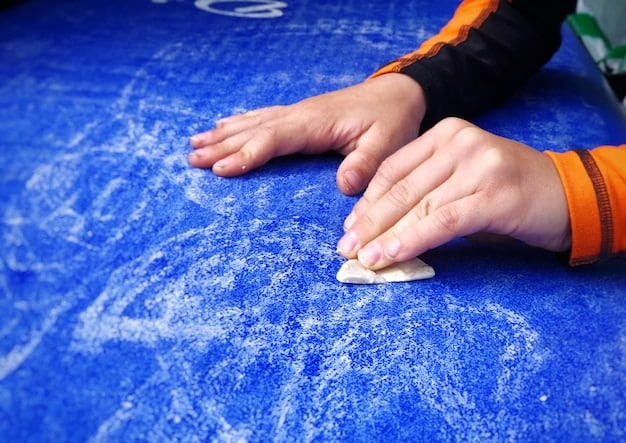
Step 3: Gently Glide the Clay Bar
Gently glide the clay bar over the lubricated surface in straight, overlapping motions. Do not apply excessive pressure. The clay bar should pick up contaminants as you move it across the paint.
Step 4: Knead and Refold the Clay Bar
- After each section, inspect the clay bar for embedded contaminants.
- Knead the clay bar to expose a clean surface, refolding it as needed.
- If the clay bar becomes heavily contaminated, discard it and use a fresh piece.
Step 5: Wipe Away Residue
Use a clean microfiber towel to wipe away any remaining clay lube residue. Inspect the paint for smoothness and repeat the process if necessary.
By following these steps carefully, you can safely and effectively remove contaminants from your car’s paint with a DIY car clay bar treatment. This will leave your car with a smooth and glossy finish.
Aftercare: Protecting Your Freshly Clayed Paint
Once you’ve completed the DIY car clay bar treatment, it’s important to protect your freshly cleaned paint. This will help maintain the smooth finish and prevent future contamination.
Applying Wax or Sealant
After claying, your car’s paint is now perfectly prepared for waxing or sealing. Apply a layer of wax or sealant to protect the paint from UV rays, environmental contaminants, and oxidation.
Choosing the Right Wax or Sealant
- Wax: Provides a deep, glossy shine but typically lasts for a shorter period (1-3 months).
- Sealant: Offers longer-lasting protection (6-12 months) and is more resistant to environmental factors.
Proper Application Techniques
Follow the manufacturer’s instructions for applying wax or sealant. Use a clean applicator pad and work in small sections. Allow the product to cure before buffing it off with a clean microfiber towel.
Protecting your freshly clayed paint with wax or sealant is a crucial step in maintaining a smooth, glossy finish. This will help keep your car looking its best for longer.
Troubleshooting Common Clay Bar Issues
While a DIY car clay bar treatment is generally straightforward, you may encounter some common issues. Here are some troubleshooting tips to help you overcome these challenges.
Clay Bar Marring the Paint
If the clay bar is marring the paint, it could be due to excessive pressure or insufficient lubrication. Ensure you are using plenty of clay lube and applying gentle pressure. If the marring persists, try using a less aggressive clay bar.
Clay Bar Sticking to the Paint
- If the clay bar is sticking to the paint, it could be due to the clay lube drying out.
- Reapply clay lube frequently and work in smaller sections to prevent this issue.
Contamination on the Clay Bar
If the clay bar becomes heavily contaminated, it’s important to knead and refold it regularly to expose a clean surface. If the contamination is severe, discard the clay bar and use a fresh piece to avoid scratching the paint.
Uneven Results
- If you notice uneven results after claying, it could be due to inconsistent technique.
- Ensure you are using overlapping strokes and applying consistent pressure throughout the process.
By addressing these common issues, you can ensure a smooth and effective DIY car clay bar treatment. Don’t be afraid to experiment and adjust your technique as needed to achieve the best results.
| Key Point | Brief Description |
|---|---|
| 🧼 Washing Car | Wash the car thoroughly to remove loose dirt before claying. |
| 🧴 Using Clay Lube | Apply generous amounts of clay lube to prevent scratching. |
| 🖐️ Inspecting Clay | Knead and refold the clay bar regularly to avoid using a contaminated surface. |
| 🛡️ Applying Wax/Sealant | Protect clayed paint with wax or sealant for lasting smoothness. |
Frequently Asked Questions
▼
A car clay bar is used to remove bonded surface contaminants like brake dust, industrial fallout, and tree sap from your vehicle’s paint, restoring a smooth surface.
▼
Typically, you should use a clay bar every 6-12 months, or whenever your car’s paint feels rough after washing, indicating contamination.
▼
Yes, clay bars can be safely used on glass and some hard plastic surfaces to remove contaminants, but ensure the surface is properly lubricated.
▼
Use a dedicated clay lubricant or detailing spray designed for clay bars to prevent scratching the paint. Never use water or soap as a substitute.
▼
Replace your clay bar when it becomes heavily contaminated, difficult to knead, or if you drop it on the ground, as it can pick up abrasive particles.
Conclusion
Performing a DIY car clay bar treatment is an effective way to remove embedded contaminants and restore a smooth, glossy finish to your car’s paint. By following the steps outlined in this guide and troubleshooting any common issues, you can achieve professional-looking results at home, ensuring your car looks its best for years to come.

")


