DIY Fluid Level Check: Maintain Your Car Like a Pro
DIY Fluid Level Check: A Quick Guide to Maintaining Optimal Car Performance provides essential steps for car owners to easily monitor and maintain their vehicle’s fluid levels, ensuring peak performance and longevity.
Is your car running as smoothly as it should? One of the simplest yet most crucial aspects of vehicle maintenance is regularly checking your fluid levels. With a DIY Fluid Level Check: A Quick Guide to Maintaining Optimal Car Performance, you can ensure your car stays in top condition, preventing costly repairs down the road. Learning how to perform these checks yourself empowers you to take control of your car’s health.
Why a DIY Fluid Level Check Matters
Maintaining your vehicle’s fluid levels is crucial for optimal performance and longevity. Neglecting these checks can lead to significant damage and costly repairs. A simple DIY routine can save you time, money, and stress.
Regular fluid checks ensure that all parts of your car are properly lubricated, cooled, and functioning as intended. This preventative measure can identify potential issues before they escalate into major problems. By understanding the importance of fluid maintenance, you’re taking a proactive step in car care.
Benefits of Regular Fluid Checks
Performing routine fluid checks can greatly extend the lifespan of your vehicle and improve its overall performance. Here are some key benefits:
- Prevents Component Damage: Ensuring adequate fluid levels prevents wear and tear on critical components like the engine and transmission.
- Enhances Fuel Efficiency: Proper fluid levels contribute to optimal engine performance, improving fuel economy.
- Reduces Repair Costs: Identifying and addressing fluid level issues early can prevent costly repairs.
- Increases Vehicle Longevity: Regular maintenance, including fluid checks, ensures your car lasts longer and performs better.
Understanding these benefits can motivate you to incorporate a DIY fluid level check into your regular car care routine. Keeping your car’s fluids topped off and in good condition is a small investment that yields significant returns.
Essential Fluids to Check in Your Car
Knowing which fluids to check is the first step in performing a DIY fluid level check. Each fluid plays a vital role in the operation and maintenance of your vehicle. Neglecting any of these could result in reduced performance or serious damage.
From engine oil to coolant, brake fluid to power steering fluid, each has a specific function and requires regular monitoring. This section will guide you through the essential fluids you need to check to keep your car running smoothly.
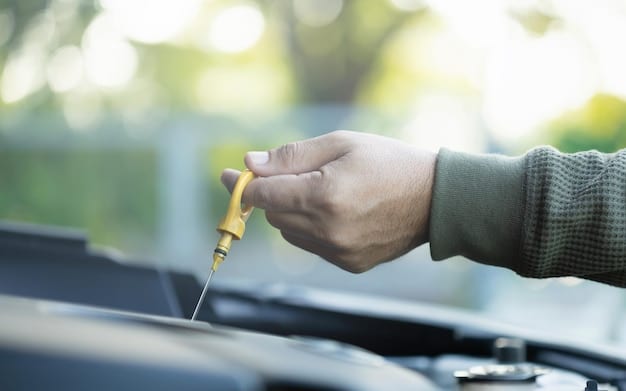
Engine Oil
Engine oil is the lifeblood of your car’s engine, providing lubrication to reduce friction and wear. Regular oil checks can help prevent engine damage. Here’s how to check it:
- Locate the Dipstick: Typically marked with an oil can symbol, the dipstick is usually yellow or orange.
- Pull and Wipe: Remove the dipstick, wipe it clean with a lint-free cloth, and reinsert it fully.
- Check the Level: Pull the dipstick out again and check the oil level. It should be between the minimum and maximum marks.
- Add Oil if Needed: If the level is low, add the appropriate type of engine oil until it reaches the full mark.
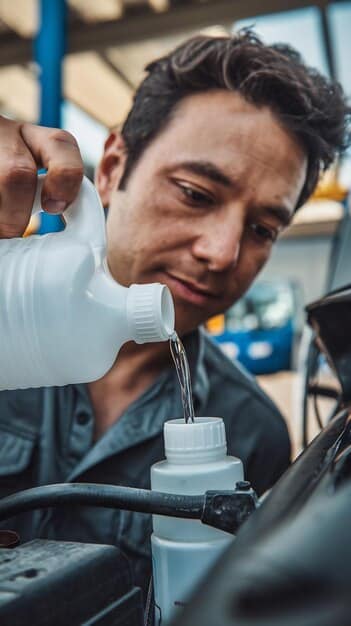
Coolant
Coolant, also known as antifreeze, regulates the engine’s temperature, preventing overheating and freezing. Here’s how to check it:
- Locate the Coolant Reservoir: This is usually a translucent plastic container with “min” and “max” level markings.
- Check the Level: The coolant level should be between the “min” and “max” lines.
- Add Coolant if Needed: If the level is low, add a 50/50 mix of coolant and distilled water.
Regularly checking these essential fluids ensures your car’s engine runs efficiently and avoids serious damage. Engine oil and coolant are critical to maintaining optimal car performance. Remember, a DIY Fluid Level Check: A Quick Guide to Maintaining Optimal Car Performance is a proactive approach to car care.
Step-by-Step Guide to Performing a DIY Fluid Level Check
Now that you know which fluids to check, let’s dive into a step-by-step guide on how to perform a DIY Fluid Level Check: A Quick Guide to Maintaining Optimal Car Performance. This process is straightforward and can be done in just a few minutes.
With the right tools and a little know-how, you can confidently check your car’s fluid levels and ensure everything is in good working order. Following these steps meticulously will help you avoid mistakes and maintain your car effectively.
Gather Your Supplies
Before starting, gather the necessary supplies. Having everything on hand will make the process smoother and more efficient. Here’s what you’ll need:
- Lint-Free Cloth or Paper Towels: For wiping dipsticks and cleaning spills.
- Funnel: To pour fluids without spilling.
- Appropriate Fluids: Engine oil, coolant, brake fluid, power steering fluid, and windshield washer fluid. Consult your owner’s manual for the correct types.
- Gloves: To protect your hands.
Performing the Checks
Follow these steps to check each fluid. Ensure your car is parked on a level surface and the engine is cool before you begin.
- Engine Oil: Locate, clean, and check the dipstick as described above.
- Coolant: Check the level in the coolant reservoir and add coolant as needed.
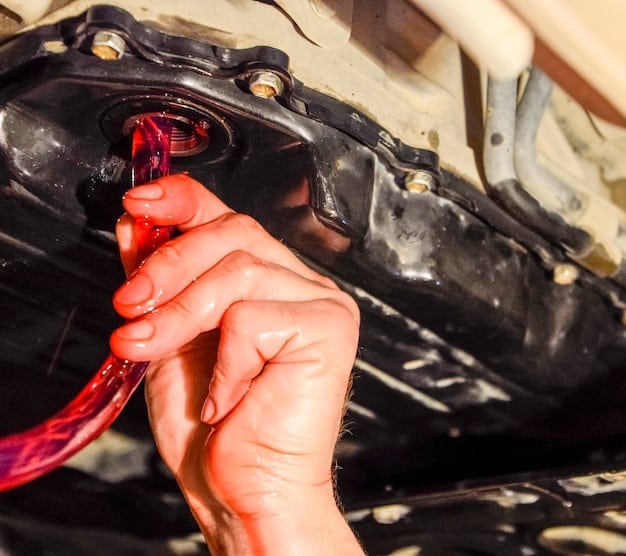
- Brake Fluid: Locate the brake fluid reservoir (usually near the master cylinder). The level should be near the “max” line. Note: Brake fluid levels decreasing may indicate worn brake pads, which you’ll want to get inspected by a proper professional.
- Power Steering Fluid: Check the power steering fluid reservoir. The level should be between the “min” and “max” lines.
- Windshield Washer Fluid: Fill the windshield washer fluid reservoir as needed.
Completing these steps ensures you’ve checked all essential fluids. A regular DIY Fluid Level Check: A Quick Guide to Maintaining Optimal Car Performance can prevent many common car problems. Remember that each fluid plays a critical role, and maintaining them is key to your car’s overall health.
Understanding Fluid Levels and What They Indicate
Simply checking your fluid levels is not enough; understanding what those levels indicate is equally important. An abnormal fluid level can signal underlying issues that need attention. Knowing how to interpret these signs can help you catch problems early.
For example, consistently low engine oil could indicate a leak or excessive oil consumption. Similarly, a drop in coolant level might suggest a leak in the cooling system. Understanding these indicators can save you from major repairs later on.
Interpreting Fluid Levels
Here’s what different fluid levels might indicate:
- Low Engine Oil: Could indicate a leak, worn piston rings, or other engine issues. Check for leaks and monitor oil consumption.
- Low Coolant: Often signals a leak in the cooling system, such as a leaky hose, radiator, or water pump. Inspect the system for visible leaks and have it pressure tested if necessary.
- Low Brake Fluid: Indicates leak in the braking system or worn brake pads. Inspect both and have the system properly inspected!
- Low Power Steering Fluid: Could mean a leak in the power steering system or worn components. Check the hoses and pump for leaks.
What to Do When Levels Are Abnormal
If you notice any abnormal fluid levels, take action promptly. Here are some steps to follow:
- Check for Leaks: Look for visible leaks around the engine, hoses, and reservoirs.
- Consult Your Owner’s Manual: Refer to your owner’s manual for specific recommendations and fluid types.
- Seek Professional Help: If you’re unsure or if the problem persists, consult a qualified mechanic.
By understanding fluid levels and what they indicate, you can proactively address potential issues. A DIY Fluid Level Check: A Quick Guide to Maintaining Optimal Car Performance involves not just checking the levels but also understanding their implications. This knowledge allows you to maintain your car effectively and ensures its long-term health.
Common Mistakes to Avoid During a DIY Fluid Level Check
While performing a DIY Fluid Level Check: A Quick Guide to Maintaining Optimal Car Performance is relatively simple, there are common mistakes that car owners often make. Avoiding these pitfalls can ensure you get accurate readings and prevent potential damage.
From using the wrong type of fluid to misinterpreting dipstick readings, these mistakes can lead to incorrect maintenance decisions. By being aware of these common errors, you can perform fluid checks more effectively and maintain your car with confidence.
Using the Wrong Type of Fluid
One of the most common mistakes is using the wrong type of fluid. Each fluid is formulated for specific purposes, and using an incorrect type can cause significant damage. Always consult your owner’s manual for the recommended fluids.
Misinterpreting Dipstick Readings
Reading the dipstick incorrectly can lead to inaccurate fluid level assessments. Ensure the dipstick is fully inserted and removed correctly. Always wipe the dipstick clean before taking a reading, and check the level on a level surface.
Overfilling Fluids
Overfilling fluids can be just as harmful as underfilling them. Overfilling engine oil, for instance, can cause aeration and reduce the oil’s lubricating properties. Always add fluids gradually and check the level frequently to avoid overfilling.
Avoiding these common mistakes will make your DIY Fluid Level Check: A Quick Guide to Maintaining Optimal Car Performance more accurate and effective. Proper fluid maintenance is essential for the longevity and performance of your vehicle. By taking the time to do it right, you can save yourself from costly repairs and ensure your car stays in top condition.
| Key Point | Brief Description |
|---|---|
| 🚗 Check Engine Oil | Use dipstick to ensure level is between min and max. |
| 💧 Monitor Coolant | Keep coolant between min and max lines in reservoir. |
| ⚠️ Brake Fluid | Maintain brake fluid level near the max line. |
| ⚙️ Power Steering Fluid | Check reservoir for fluid between min and max. |
Frequently Asked Questions (FAQ)
It’s recommended to check your car’s fluid levels at least once a month, or more frequently if you notice any warning signs like leaks or unusual engine behavior. Regular checks ensure optimal performance.
You’ll need a lint-free cloth or paper towels for wiping, a funnel for adding fluids, the appropriate fluids for your car, and gloves to protect your hands. Check your owner’s manual for fluid specifications.
Consistently low engine oil levels could indicate a leak or excessive oil consumption. Check for visible leaks around the engine and monitor your oil consumption. Consult a mechanic if the problem persists.
No, you should only use the type of coolant recommended in your owner’s manual. Using the wrong type of coolant can cause corrosion and damage to your cooling system.
If you overfill a fluid, remove the excess to bring it back to the correct level. Overfilling can cause problems, such as aeration of engine oil. Seek professional help if you’re unsure how to correct it.
Conclusion
Performing a DIY Fluid Level Check: A Quick Guide to Maintaining Optimal Car Performance is a simple yet crucial aspect of car maintenance. By regularly checking your engine oil, coolant, brake fluid, and power steering fluid, you can ensure your vehicle runs smoothly and prevent costly repairs.
Understanding the importance of fluid levels, the steps involved in checking them, and common mistakes to avoid empowers you to take proactive care of your car. Keep your car in top condition with these essential DIY checks.


