DIY Headlight Restoration: Get 50% Brighter Lights for Under $20
DIY Headlight Restoration: Get 50% Brighter Lights for Under $20 is achievable with simple steps and readily available materials. This affordable method effectively removes haze and yellowing, significantly improving headlight clarity and visibility at night.
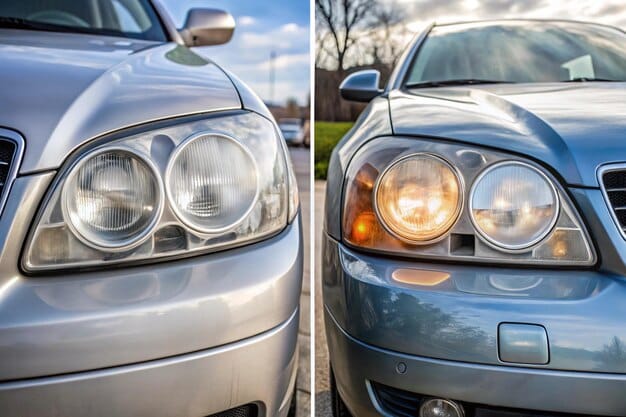
Cloudy or yellowed headlights are not just an eyesore; they significantly reduce visibility, making nighttime driving hazardous. Professional headlight restoration services can be expensive, but fortunately, you can achieve similar results at home with a simple DIY Headlight Restoration: Get 50% Brighter Lights for Under $20 project.
This guide will walk you through each step, providing clear instructions and helpful tips to restore your headlights to their former glory. Get ready to enhance your car’s appearance and, more importantly, improve your safety on the road using DIY Headlight Restoration: Get 50% Brighter Lights for Under $20.
Why DIY Headlight Restoration?
Headlight lenses are typically made of polycarbonate plastic, which is durable but prone to yellowing and clouding due to prolonged exposure to UV rays, road debris, and environmental pollutants. This deterioration reduces the amount of light your headlights emit, compromising your visibility, especially at night.
Opting for DIY Headlight Restoration: Get 50% Brighter Lights for Under $20 offers several advantages over professional services. Not only is it cost-effective, but it also allows you to take control of the process and ensure the job is done to your satisfaction. Plus, it’s a rewarding project that can significantly improve your car’s aesthetics and safety.
Cost Savings
Professional headlight restoration can range from $75 to $150 per headlight. By choosing to do it yourself, you can save a considerable amount of money. Most of the materials you’ll need are readily available at auto parts stores or even in your garage, making DIY Headlight Restoration: Get 50% Brighter Lights for Under $20 a budget-friendly option.
Improved Visibility
Restoring your headlights not only enhances their appearance but also dramatically improves the amount of light they emit. Clearer headlights mean better visibility at night, reducing the risk of accidents and making driving safer for you and other motorists.
- Enhanced Safety: Clear headlights improve visibility, especially during nighttime driving.
- Cost-Effective: Save money compared to professional restoration services.
- DIY Satisfaction: Enjoy the satisfaction of improving your car’s appearance and safety yourself.
In summary, choosing DIY Headlight Restoration: Get 50% Brighter Lights for Under $20 is a practical and beneficial option. It allows you to save money, improve your car’s aesthetics, and enhance your safety on the road by ensuring your headlights are functioning optimally.
Essential Materials and Tools for DIY Headlight Restoration
Before you begin, gather all the necessary materials and tools. Having everything on hand will make the restoration process smoother and more efficient. Fortunately, most of these items are inexpensive and easy to find.
Here’s a comprehensive list of what you’ll need to perform DIY Headlight Restoration: Get 50% Brighter Lights for Under $20:
Required Materials
- Sandpaper (Various Grits): 400, 600, 1000, 2000, and 3000 grit sandpaper. These are essential for removing the damaged layers of plastic.
- Masking Tape: To protect the surrounding paint from scratches and damage.
- Headlight Restoration Compound: A polishing compound specifically designed for restoring headlights.
- UV Protectant Clear Coat: To protect the newly restored headlights from future UV damage.
- Microfiber Cloths: For cleaning and polishing the headlights.
- Spray Bottle with Water: To keep the sandpaper and headlight surface wet during sanding.
Tools You’ll Need
In addition to the materials, you’ll also need a few basic tools to complete the job effectively:
- Sanding Block: Provides a flat, even surface for sanding.
- Polishing Pad or Buffing Wheel: If you have a power drill, a polishing pad or buffing wheel can speed up the polishing process.
- Gloves: To protect your hands from chemicals and abrasives.
Having all these materials and tools ready before you start ensures a smooth and efficient DIY Headlight Restoration: Get 50% Brighter Lights for Under $20 project. Proper preparation will save you time and ensure the best possible results.
By assembling all of these items, you’re well-prepared to tackle the challenges of restoring your headlights and achieving brighter, clearer visibility on the road.
Step-by-Step Guide to DIY Headlight Restoration
Now that you have all the necessary materials and tools, let’s dive into the step-by-step process of restoring your headlights. Follow these instructions carefully to achieve optimal results with your DIY Headlight Restoration: Get 50% Brighter Lights for Under $20 project.
These steps will guide you through sanding, polishing, and protecting your headlights, ensuring they look as good as new and provide brighter visibility.
Step 1: Protect the Surrounding Area
Use masking tape to carefully protect the paint around the headlights. This will prevent accidental scratches or damage during the sanding process. Apply multiple layers of tape for added protection.
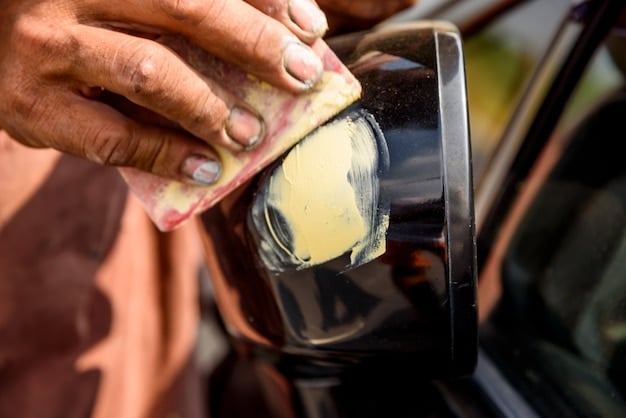
Step 2: Wet Sanding
Begin with the 400-grit sandpaper. Wet the sandpaper and the headlight surface thoroughly with water. Sand the headlight in a back-and-forth motion, applying even pressure. Continue sanding until the surface is uniformly hazy.
Repeat this process with progressively finer grits of sandpaper (600, 1000, 2000, and 3000), rinsing the headlight and sandpaper between each grit. This will gradually smooth out the surface.
Step 3: Polishing
Apply a small amount of headlight restoration compound to a microfiber cloth or polishing pad. If using a polishing pad attached to a power drill, work in small sections, applying even pressure. If using a microfiber cloth, rub the compound onto the headlight in a circular motion.
Continue polishing until the headlight becomes clear and glossy. This step removes the fine scratches left by the sandpaper.
Step 4: UV Protection
Apply a UV protectant clear coat to the headlight surface. This will protect the plastic from future UV damage and prevent yellowing and clouding. Follow the manufacturer’s instructions for application.
Step 5: Final Touches
Remove the masking tape and inspect the restored headlight. If necessary, apply another coat of UV protectant for added protection. Clean any residue with a clean microfiber cloth.
By following these steps carefully, you can successfully complete your DIY Headlight Restoration: Get 50% Brighter Lights for Under $20 project. Enjoy your clearer, brighter headlights and improved visibility on the road.
Tips for Achieving the Best Results with DIY Headlight Restoration
While the step-by-step guide provides a solid foundation for restoring your headlights, incorporating these tips can help you achieve even better results with your DIY Headlight Restoration: Get 50% Brighter Lights for Under $20.
These tips cover everything from selecting the right materials to mastering the sanding and polishing techniques, ensuring your headlights look their best.
Choose High-Quality Materials
Investing in high-quality sandpaper, polishing compounds, and UV protectants can make a significant difference in the final outcome. Opt for reputable brands that are known for their effectiveness and durability.
Proper Wet Sanding Technique
Wet sanding is crucial for removing the damaged layers of plastic without causing excessive scratches. Always keep the sandpaper and headlight surface wet, and use even pressure to avoid uneven sanding.
Take Your Time
Rushing through the restoration process can lead to subpar results. Take your time with each step, ensuring that you are thoroughly sanding and polishing the headlights. Patience is key to achieving a professional-quality finish.
- Use Quality Products: Investing in good sandpaper and compounds improves results.
- Maintain Wet Sanding: Keep the surface wet to prevent scratches.
- Apply Even Pressure: Ensure uniform sanding and polishing.
By incorporating these tips into your DIY Headlight Restoration: Get 50% Brighter Lights for Under $20 project, you can maximize your chances of success and enjoy headlights that look as good as new. These simple adjustments can make a significant difference in the overall quality and longevity of your restoration.
Remember, the key to a successful headlight restoration is attention to detail and a commitment to following the recommended techniques. With these tips, you’ll be well-equipped to achieve outstanding results.
Maintaining Your Restored Headlights
Once you’ve successfully restored your headlights, it’s essential to take steps to maintain their clarity and prevent future yellowing and clouding. Proper maintenance will prolong the life of your restoration and ensure your headlights continue to provide optimal visibility.
Here are some key strategies for maintaining your DIY Headlight Restoration: Get 50% Brighter Lights for Under $20:
Regular Cleaning
Wash your headlights regularly with mild soap and water to remove dirt, grime, and environmental pollutants. This will prevent the buildup of contaminants that can accelerate the deterioration of the plastic.
Apply UV Protectant Regularly
Reapply a UV protectant clear coat every few months to shield the headlights from harmful UV rays. This will help prevent yellowing and clouding over time.
Park in Shaded Areas
When possible, park your car in shaded areas or garages to minimize exposure to direct sunlight. This will reduce the rate at which the plastic deteriorates.
- Regular Washing: Keep headlights clean to prevent buildup of contaminants.
- Reapply UV Protection: Shield headlights from UV rays every few months.
- Park in Shade: Minimize exposure to direct sunlight.
By following these maintenance tips, you can significantly extend the life of your restored headlights and keep them looking clear and bright. This will not only enhance your car’s appearance but also ensure your safety on the road. DIY Headlight Restoration: Get 50% Brighter Lights for Under $20 is an investment, and these tips help protect that investment.
Consistent maintenance is key to preserving the results of your headlight restoration. With just a few simple steps, you can ensure your headlights remain in top condition for years to come.
| Key Point | Brief Description |
|---|---|
| 💡 Why DIY? | Cost-effective and improves visibility. DIY Headlight Restoration: Get 50% Brighter Lights for Under $20. |
| 🛠️ Essential Materials | Sandpaper, masking tape, compound, UV protectant, and cloths. |
| ⛑️ Protection First | Mask the surrounding area before sanding to prevent scratches. |
| 🛡️ UV Protection | Apply UV protectant regularly to prevent future clouding. |
Frequently Asked Questions
With proper application of UV protectant and regular cleaning, DIY Headlight Restoration: Get 50% Brighter Lights for Under $20 can last anywhere from six months to a year before needing reapplication.
While some people have success with toothpaste, it’s not as effective as dedicated headlight restoration compounds. Toothpaste is a temporary solution and doesn’t offer UV protection.
Start with 400-grit sandpaper if your headlights are severely yellowed or cloudy. For less severe cases, you can begin with 600-grit sandpaper. It’s key to assess the condition before you start.
Yes, applying a UV protectant is crucial to prevent the headlights from yellowing and clouding again. Without it, the restored headlights will quickly deteriorate due to UV exposure.
Reapply UV protectant every few months to maintain the clarity of your headlights. This will help shield them from harmful UV rays and extend the life of your restoration.
Conclusion
Restoring your headlights is a worthwhile investment that enhances your vehicle’s appearance and improves driving safety. DIY Headlight Restoration: Get 50% Brighter Lights for Under $20 is both achievable and cost-effective, offering significant benefits over professional services.
By following the steps outlined in this guide and maintaining your restored headlights, you can enjoy clearer, brighter visibility on the road for years to come. This straightforward project not only saves you money but also provides a sense of accomplishment in caring for your vehicle.


")

")