How to Properly Use a Dual-Action Polisher for Paint Correction
Using a dual-action polisher for paint correction involves selecting the right pad and compound, applying consistent pressure, and working in overlapping passes to remove imperfections and restore a vehicle’s paint finish.
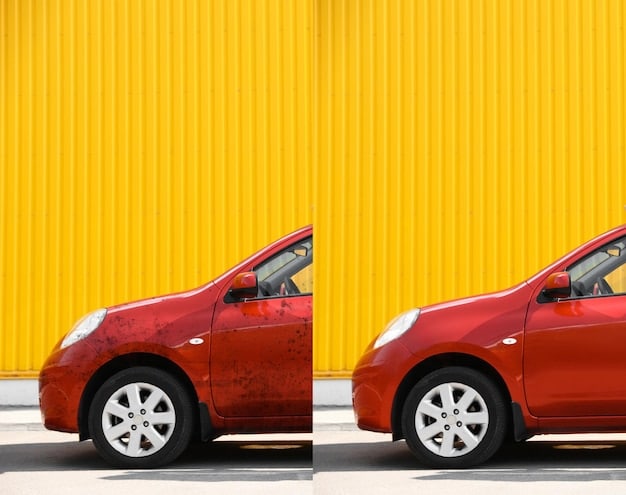
Achieving a flawless finish on your vehicle’s paint requires more than just washing and waxing. When your car’s paint is marred by swirl marks, scratches, or oxidation, it’s time to consider paint correction. One of the most effective tools for this task is a dual-action polisher. Learning how to properly use a dual-action polisher for paint correction can transform your car’s appearance, restoring its showroom shine.
Understanding Dual-Action Polishers
Before diving into the process, it’s essential to understand what a dual-action polisher is and why it’s a preferred tool for paint correction. Unlike rotary buffers, which can quickly damage paint if used improperly, dual-action polishers offer a safer, more controlled approach.
What is a Dual-Action Polisher?
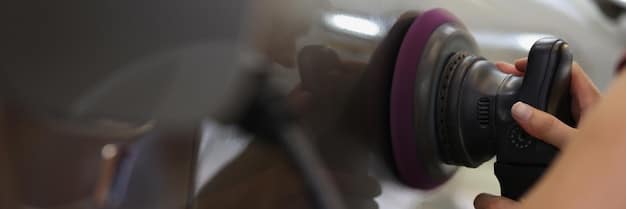
A dual-action (DA) polisher moves in two ways simultaneously: it rotates and oscillates. This dual motion reduces the risk of creating holograms or burn marks on the paint, making it much more forgiving than a rotary polisher. DA polishers are ideal for both beginners and experienced detailers.
Benefits of Using a Dual-Action Polisher
The benefits of using a DA polisher extend beyond just safety. They include:
- Reduced Risk of Damage: The dual motion minimizes the risk of burning through the paint.
- Ease of Use: DA polishers are easier to control, making them suitable for beginners.
- Versatility: They can be used for various tasks, from light polishing to more aggressive paint correction.
- Consistent Results: DA polishers deliver consistent results across the entire surface.
Understanding these benefits will help you appreciate the value of learning how to properly use a DA polisher for paint correction.
Gathering the Necessary Supplies
To effectively use a dual-action polisher for paint correction, you’ll need to gather the right supplies. Having everything on hand before you start will ensure a smoother, more efficient process.
Essential Supplies for Paint Correction
Here’s a list of the essential supplies you’ll need:
- Dual-Action Polisher: Choose a reputable brand with adjustable speed settings.
- Polishing Pads: You’ll need a variety of pads, including cutting pads, polishing pads, and finishing pads.
- Polishing Compounds: Select a range of compounds from heavy cutting to fine polishing.
- Microfiber Towels: Use high-quality microfiber towels for removing polish residue.
- Detailing Clay: Clay bar to remove surface contaminants before polishing.
- Isopropyl Alcohol (IPA): For wiping down the paint to inspect your progress.
- Masking Tape: To protect delicate areas like trim and emblems.
- Good Lighting: Essential for spotting imperfections in the paint.
Choosing the Right Pads and Compounds
Selecting the correct pads and compounds is crucial for achieving the desired results. Consider the following:
- Cutting Pads: These are aggressive pads used for removing deep scratches and swirl marks. Pair them with a heavy cutting compound.
- Polishing Pads: These pads are less aggressive and used for removing lighter imperfections and refining the paint. Use them with a polishing compound.
- Finishing Pads: These are the softest pads, used for applying a final polish or sealant. Pair them with a finishing polish.
By having the right supplies and understanding their uses, you’ll be well-prepared to tackle paint correction with a dual-action polisher.
Preparing the Vehicle for Polishing
Proper preparation is key to achieving the best results with paint correction. This involves cleaning the vehicle thoroughly and addressing any surface contaminants that could interfere with the polishing process.
Washing and Decontaminating the Paint
Start by thoroughly washing the vehicle to remove any dirt, grime, and loose contaminants. Use a high-quality car wash soap and a microfiber wash mitt. After washing, decontaminate the paint using a detailing clay bar.
Why Clay Bar is Important
A clay bar removes embedded contaminants that washing alone cannot remove, such as:
- Brake Dust: Tiny metal particles from brake pads.
- Industrial Fallout: Airborne pollutants that bond to the paint.
- Tree Sap: Sticky residue from trees.
These contaminants can scratch the paint during polishing, so it’s essential to remove them beforehand.
The Polishing Process: Step-by-Step
Now that the vehicle is prepped and you have your supplies ready, it’s time to start the polishing process. This involves several steps, each contributing to the final result.
Applying the Polishing Compound
Begin by applying a small amount of polishing compound to the pad. A few pea-sized drops are usually sufficient. Prime the pad by gently dabbing it on the paint in several spots before turning on the polisher.
Polishing Technique
Use the following technique for polishing:
- Speed Setting: Start with a low speed setting (around 2-3) and gradually increase as needed.
- Pressure: Apply moderate, consistent pressure to the polisher.
- Overlapping Passes: Work in overlapping passes, moving the polisher slowly and steadily across the surface.
- Section Size: Focus on small sections (about 2×2 feet) at a time.
After completing a section, wipe away the polish residue with a clean microfiber towel. Inspect the paint to assess your progress. If necessary, repeat the process or switch to a more aggressive pad and compound.
Refining and Finishing the Paint
After the initial polishing, you’ll need to refine the paint to remove any remaining imperfections and enhance the gloss. This involves using finer polishes and softer pads.
Using a Finishing Polish
A finishing polish is designed to remove any light swirl marks or holograms left by the earlier stages of polishing. Apply a small amount of finishing polish to a finishing pad and use the same polishing technique as before.
Applying a Paint Protectant
Once you’re satisfied with the finish, it’s time to protect the paint. There are several options for paint protection, including:
- Wax: Provides a layer of protection and enhances the gloss.
- Sealant: Offers longer-lasting protection than wax.
- Ceramic Coating: Provides the most durable and long-lasting protection.
Follow the instructions on the product label for application. This final step will help maintain the corrected paint and keep your vehicle looking its best.
Common Mistakes to Avoid
While dual-action polishers are relatively safe to use, there are still some common mistakes that can lead to unsatisfactory results or even damage the paint. Knowing these pitfalls can help you avoid them.
Overheating the Paint
One of the most common mistakes is overheating the paint by applying too much pressure or working in one spot for too long. This can cause the paint to burn or blister. Keep the polisher moving and avoid excessive pressure.
Using Dirty Pads
Using dirty pads can introduce contaminants that scratch the paint. Clean your pads regularly during the polishing process. You can use a pad cleaning brush or compressed air to remove polish residue.
Ignoring Surface Preparation
Skipping the surface preparation steps (washing and claying) can lead to poor results. Contaminants on the paint can cause scratches during polishing, undoing your hard work.
| Key Point | Brief Description |
|---|---|
| 🧼 Washing & Claying | Essential for removing dirt and contaminants before polishing. |
| ⚙️ Polishing Technique | Use overlapping passes and consistent pressure for even correction. |
| 🛡️ Paint Protection | Apply wax, sealant, or ceramic coating to protect the corrected paint. |
| ⚠️ Avoiding Mistakes | Prevent overheating, use clean pads, and don’t skip surface prep. |
Frequently Asked Questions
▼
A dual-action polisher oscillates and rotates, reducing the risk of heat buildup and paint damage. A rotary polisher only rotates, which can be more aggressive and requires more skill to use safely.
▼
Choose a pad based on the severity of the paint imperfections. Cutting pads are for heavy correction, polishing pads for moderate imperfections, and finishing pads for refining the paint.
▼
Yes, dual-action polishers can be used on most types of automotive paint, including clear coat, single-stage, and metallic finishes. Always test a small, inconspicuous area first.
▼
Polishing frequency depends on driving conditions and paint maintenance. Generally, polishing once or twice a year is sufficient for removing minor imperfections and maintaining a glossy finish.
▼
After polishing, protect the paint with a wax, sealant, or ceramic coating. This will help maintain the corrected paint, prevent future damage, and keep your vehicle looking its best.
Conclusion
Mastering how to properly use a dual-action polisher for paint correction can significantly enhance your vehicle’s appearance. By following the steps outlined in this guide, you can achieve a professional-quality finish and protect your investment for years to come.
")


